
How to photograph food
A great food photograph can do far more than just make you hungry, it can tempt you to order a dish in a restaurant, convince you to try the special offer in the supermarket or even entice you to buy that recipe book you really don’t need!
Pink Lady® Food Photographer of the Year's diverse range of categories celebrates food photography in the multitude of ways it touches our lives: from styled food for magazines to images of families eating together.
Open to both professional and non-professional photographers, we wanted to put together some top food photography tips to think about. From getting the right lighting, useful props, from food styling tricks to the right camera angle.
There's no need for elaborate setups, all you need for great food photography results is a camera, natural light, some props such as distinctively patterned bowls, plates and cutlery and of course, delicious food.
With such an array of food photography styles, we asked Tom Bonnett, an Assistant Producer at the Good Food Channel website, to share some of the helpful tips. Tom had gathered these tips whilst working with photographers, food stylists and prop stylists in the food photography industry, including our 2012 Food Portraiture category winner Hilary Moore.

LIGHTING TIPS FOR FOOD PHOTOGRAPHY
Food Photography Lighting
Natural light is always the best lighting for food photography, so don't waste your money on expensive flashguns or lightboxes - just choose a place to shoot with a decent-sized window.
Food and prop stylist Kate Wesson says a good natural light source is crucial.
"Turn off any overhead electric lights and get close to the window, a side north-facing light is best or experiment with an overhead natural light source," she says.
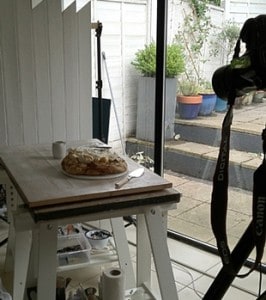
Photography Lighting Setup
In summer, avoid south-facing windows if you can as you could get a lot of direct sunlight on your food that will darken the shadows and brighten the highlights. This will stop you getting the soft tones in your resulting photos that help create beautiful food shots.
Useful Lighting Props, Tips and Tricks
It can be difficult to get enough light on the food to show off the ingredients without overexposing other areas of the picture but simple lighting props such as black or white card or baking parchment are commonly used for removing light or bouncing it into the shot.
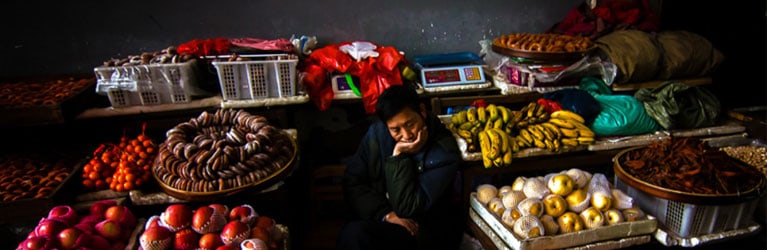
This photograph was taken by Tim Hill. Tim has been a food photographer for more than 20 years and he says, in the age of Photoshop, techniques that were commonly used in the past are often overlooked. Tim suggests we look 'back to basics...'
"Black velvet is wonderful at limiting stray light and providing a deep black tone in an image. Black net placed between the subject and the light will reduce the intensity of the light without diffusing it," he says. "White net, similarly used, will softly diffuse light."Make up mirrors used with a directional light will provide little pools of light like miniature spotlights for very little cost. Also invaluable are the pieces of silver foil card from takeaway packs and gold and silver foil cards from smoked salmon packs carefully cleaned."
USEFUL PROPS FOR FOOD PHOTOGRAPHY
Choosing your food photo props
Props allow you to create a world for the food that helps you put across where the food is from, what time of year it's in season or how it should be eaten. The skill is in keeping it natural and the props subtle.
Stylist Olivia Wardle says:
"Props should always complement rather than detract from the food. Colours and patterns are fabulous but should be used creatively to aid rather than overpower the food. I am a big fan of texture in imagery. I like to mix a variety of textures to make the props look as tactile and inviting as possible."
Olivia uses tones and texture to create atmosphere but the food remains the focus of the image.
Wesson agrees that layering up different textures always makes for an interesting shot. She says:
"Using weathered chopping boards with frayed edged clothes or painted distressed woods and chipped enamels, stuff you might ordinarily throw away, can look great in food photography."
Positioning of Food Photography Props
Getting your food photography props positioned so they look natural can take time.
Have fun moving your props around and try putting something at the edge of the frame to give a hint of context without distracting from the food.
Food photographer Charlie Richards tries to avoid having equal numbers of any prop in a shot because the symmetry can become distracting.
Tips and Tricks for Food Photography Prop Choices
A good rule to stick to is to think about whether the prop you are adding would be there in real life. If you have set up a beautiful dinner table, would you have the bowl you made your cake mixture in the background? Probably not, as you would have left the bowl in the kitchen and put the cake on the table when it was ready.
Tips for the Right Prop Colour Scheme
Seattle-based Clare Barboza is a documentary food photographer who loves "the story behind the food". Clare uses similar-coloured props to make the food 'pop' out and grab attention.
"Think about your colour story when picking props," she says. "What will showcase the food the best? Complementary colours like blue and orange, red and green or violet and yellow can look lovely in a shot and really make things pop. Another approach is to use varying shades of the same color in your props, so that the food really stands out."
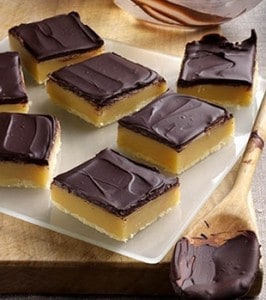
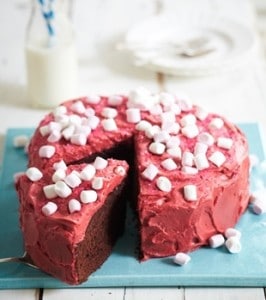
This image by Charlotte Tolhurst, styled by Kate Wesson, is a good example of using colour to give the right impression. The photo looks suitably American because of its red, white and blue colour scheme.
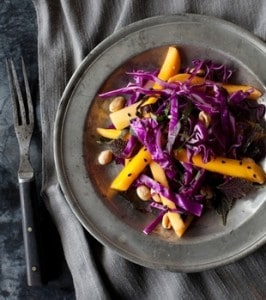
Stylist Lucy Harvey gives another example. "For a beetroot dish, a soft jade green works well for the plate, bowl, background or napkin," she explains.
"But make sure there are blueish purple-ish tones in the jade green. A yellowish green wouldn't look right at all! For a dish using oranges, try a light or pale turquoise blue with greenish yellowish tones. Also, using props and fabrics with a matt finish can be helpful because they're much easier to light."
STYLING TIPS FOR FOOD PHOTOGRAPHY
Size and Proportions Tips
The camera can make props look unusually over-proportioned so pick props that scale properly.
"A normal size piece of cutlery in real life can look like a garden tool in a photograph," says Lucy "Smaller scale props often work better. A normal size baking dish can look like a vast landscape of food through the lens."
Clare Barboza found photographing a small piece of salmon looked far prettier than a shot of the whole fish.
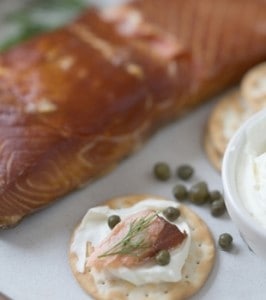
This applies to the food too. "Smaller food often photographs better than large platters of food," says Barboza.
"In this photo, I had to photograph a chunk of smoked salmon. The piece of fish was on the larger size and not terribly attractive, so I sliced off a small portion and re-styled it on a cracker with cheese and capers. It became easier to shoot and much more attractive."
Framing Tips for Food Styling
- When dealing with food that you can't scale down, an overhead view is often best. This also removes the need for a backdrop.
- Alternatively, you can line up the camera so the food looks like it is on the table in front of you, ready to eat.
- More often than not, you'll need a backdrop behind to stop you getting your kitchen cabinets or bookshelf in the background of the image.
- You can make your own by hanging parchment, wallpaper or a board in the background.
- Experiment with your camera settings and try blurring the background. This can create a softer feel.
- A tripod is really helpful for eliminating camera shake when experimenting with different shutter speeds and apertures, especially in low light.
Choosing your Ingredients to Style for Food Photography
Choose fresh ingredients with great colours and think about the composition and how they will work together to make your final image. Ingredients don't always have to be perfectly formed but bear in mind shape, size and colour.
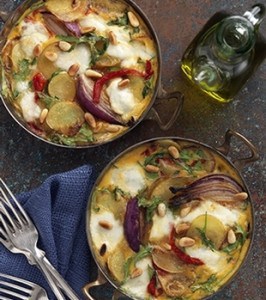
Award-winning food photographer Hilary Moore took this shot on an actual hob to achieve that "just cooked" feel.
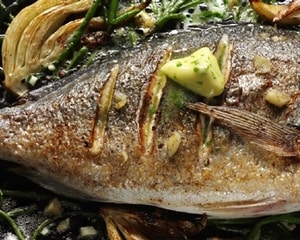
"It was shot at various stages of cooking," she says. "The sea bream is the absolute hero so it was vital to get the best looking fish available. A variety was bought from supermarkets and fishmongers. It's amazing how different they all look. I finally used this one from a local fishmonger because of its shape and colour and because its fins were still intact."
Cooking Tips for your Styled Food
It's important not to overcook your vegetables and meat or the colours will look grey and less appetising, Hilary adds. "Always ask yourself, 'would I want to eat this?' If the answer is 'yes' then you're on the right track."
It's important to work quickly so you'll capture the food at its very best. This means it's a good idea to compose the shot using props without fresh food in then add it as soon as it's ready so you shoot while the food looks fresh. Herbs and vegetables may start to wilt or lose their colour so, if a shot takes longer than expected to get right, spruce it up with some fresh herbs or vegetables for the final shot.
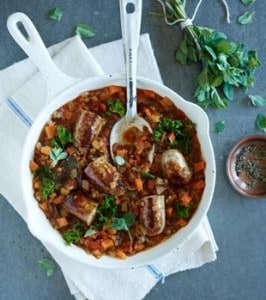
Kate Wesson added chopped herbs to give freshness to this slow-cooked casserole.
To really elevate a dish, Wesson suggests adding garnishes such as a sprinkling of pepper, a drizzle of olive oil or fresh herbs.
"I try to avoid making things look too placed and perfect," she says. "Experiment with how and where you put garnish - it can be tricky at first to make a plate look casually thrown together and beautiful as opposed to a mess. When chopping herbs, I like to use a pair of scissors to trim the ends of the leaves so you just get the interesting outside edges with more shape."
CHOOSING YOUR CAMERA ANGLE FOR FOOD PHOTOGRAPHY
Photographer Tim Hill says get the image right through the lens to avoid giving yourself extra work later.
Hill comes from a time when re-touching was done on film with a paintbrush by incredibly skilful and expensive artists rather than Photoshop.
"This meant I was schooled to solve problems before shooting," he says. "A change of lighting, camera angle or subject often eliminates problems that would take time sat in front of a computer using Photoshop."
The most important ingredient in a shoot, according to Tim, is a sense of humour as the ridiculous can occur without warning!
Lighting, props, food styling and camera angles are all influential in getting that amazing Food Photograph! We hope that these tips and tricks give you more insight and creativity on how to photograph food.
For more tips and tricks, and to gain insight from our entrants and skilled judges, visit our Blog.
Looking for inspiration? Immerse yourself in our breath-taking photographs in our Finalist Galleries, and discover the range of food photography through our categories.
Finally - if you want to enter the Pink Lady® Food Photographer of the Year 2021, then sign-up here >>
Recent Posts
- Winners Announcement 2024 June 5, 2024
- Plate! St James's May 30, 2024
Categories
Archives
Join our community
Sign up to our mailing list today and become part of our exclusive community. Be the first to know tips and tricks from our judges, stories from our photographers and all the very latest news.